 Introduction to Radiant
Here are two screenshots showing both the
Radiant editor and an in-game shot .
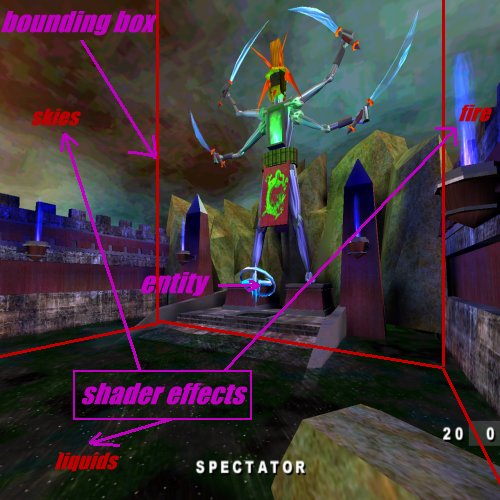
 Here you can see the outline of the bounding box that surrounds this map.
You can also see some of the shader effects available to you in the editor.
The quad damage pictured in the center is an example of an entity. I'll explain
entities in more detail later on.
 And finally here is our baby! The glorious editor that will make your mapping
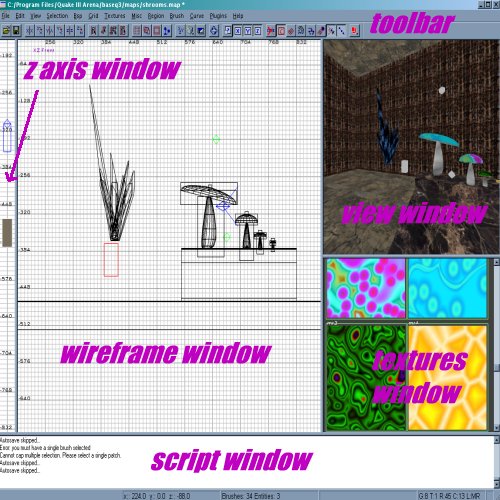
dreams come true. You can see six primary editing areas pictured above.
The toolbar is the captain of the ship controlling the majority of the functions.
The wireframe window shows the x, y, and z veiws with only the geometry of
your brushes being visible. The z axis window controls the vertical control on
the map and allows you to manipulate brush depth. The veiw window shows the
map in real time with textures applied. It's the veiw that will give you an idea
about what your changes will look like. The textures window displays the images
that you've selected to cover your brushes with. The editor will make available
the default images and shaders from the game but you can make your own as well.
The script window simply shows what the engine is doing as you design the map.
Now for a quick look at the tool bar and some of it's functions.

 Introduction to Radiant
Here are two screenshots showing both the
Radiant editor and an in-game shot .
 Here you can see the outline of the bounding box that surrounds this map.
You can also see some of the shader effects available to you in the editor.
The quad damage pictured in the center is an example of an entity. I'll explain
entities in more detail later on.
 And finally here is our baby! The glorious editor that will make your mapping
dreams come true. You can see six primary editing areas pictured above.
The toolbar is the captain of the ship controlling the majority of the functions.
The wireframe window shows the x, y, and z veiws with only the geometry of
your brushes being visible. The z axis window controls the vertical control on
the map and allows you to manipulate brush depth. The veiw window shows the
map in real time with textures applied. It's the veiw that will give you an idea
about what your changes will look like. The textures window displays the images
that you've selected to cover your brushes with. The editor will make available
the default images and shaders from the game but you can make your own as well.
The script window simply shows what the engine is doing as you design the map.
Now for a quick look at the tool bar and some of it's functions.
