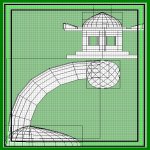
 Modeling with Prefabs
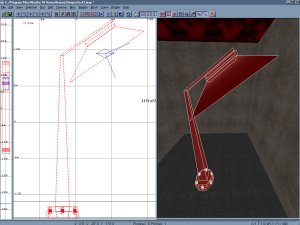
Now we'll make the light. Just make an angled
brush that will line up with the base of the arm
at the top of the pole. Make it at least twice the
width of the arm. Now we'll add a light beam for
some additional eye candy. Go to the tutorial
here on light beams. Once the beam is done
angle the beam brush and line it up so that it's
border matches the edges of the light brush.
Modeling with Prefabs
Now we'll make the light. Just make an angled
brush that will line up with the base of the arm
at the top of the pole. Make it at least twice the
width of the arm. Now we'll add a light beam for
some additional eye candy. Go to the tutorial
here on light beams. Once the beam is done
angle the beam brush and line it up so that it's
border matches the edges of the light brush.
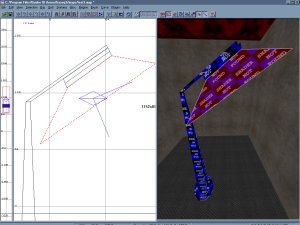
 Now add some bolts at the base like the picture
above by using the cylinder option on the curves
menu. These are four units square with a normal
endcap applied. The only thing left to do now is to
texture our new creation. The 'base_lights' folder
has some cool textures you could use for the light
source. I've used the 'pewter_shiney' and 'dark_
tin2' from the 'base_trim' folder to cover the pole
and it's base. Once your happy with the final
Now add some bolts at the base like the picture
above by using the cylinder option on the curves
menu. These are four units square with a normal
endcap applied. The only thing left to do now is to
texture our new creation. The 'base_lights' folder
has some cool textures you could use for the light
source. I've used the 'pewter_shiney' and 'dark_
tin2' from the 'base_trim' folder to cover the pole
and it's base. Once your happy with the final
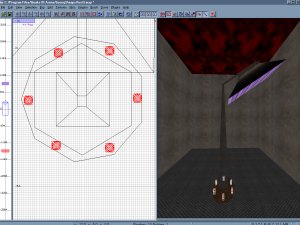
 results, select all of the brushes used to make
your new model and go to the edit option on the
tool bar and select 'save selection as prefab'.
Make sure you have a 'prefabs' folder in your
baseq3 directory and just save the selected
brushes as 'lamp.pfb' or whatever. Now let's see
what this baby looks like. Save, compile, and
launch Q3.
results, select all of the brushes used to make
your new model and go to the edit option on the
tool bar and select 'save selection as prefab'.
Make sure you have a 'prefabs' folder in your
baseq3 directory and just save the selected
brushes as 'lamp.pfb' or whatever. Now let's see
what this baby looks like. Save, compile, and
launch Q3.